Spring MVC 상품 서비스 설계 해보기
2020/5/22 ~ 2020/5/23
상품 서비스 설계 해보기 with Spring boot
프로젝트 -Maven project -Spring boot : 2.5 사용 -java11
dependency Spring web Thymeleaf 템플릿 Lombok
😀 Welcome 페이지 만들기 경로: /resources/static/index.html
<html>
<head>
<meta charset="UTF-8">
<title>Title</title>
</head>
<body>
	<ul>
		<li>상품 관리
			<ul>
				<li><a href="/basic/items">상품 관리 - 기본</a></li>
			</ul>
		</li>
	</ul>
</body>
</html>
http://localhost:8080/ - 실행시 아무 이상 없이 “상품관리 – 기본” 리스트가 잘 떴음
요구사항 분석 - 상품을 관리 할 수 있는 서비스를 만들기
상품 도메인 모델
- 상품 ID
- 상품명
- 가격
- 수량
상품 관리 기능
- 상품 목록
- 상품 상세
- 상품 등록
- 상품 수정
진행 흐름 클라이언트 → 상품목록(컨트롤러) → 상품등록 → 상품저장( 저장후 상품 상세로 돌아감) → 상품 상세보기 → 상품 수정 (수정후 상품상세로 돌아감)
상품 도메인 개발
@Data //도메인 모델엔 게터 세터만 사용하는게 안전
public class Item {

	private Long id;
	private String itemName;
	private Integer price; //price가 null 값이 들어 갈 수도 있다는 가정때문에 integer
	private int quantity; // 상동

	public Item() {

	}

	public Item(String itemName, Integer price, Integer quantity) {
		this.itemName = itemName;
		this.price = price;
		this.quantity = quantity;
	}
}
상품데이터 저장소
@Repository
public class ItemRepository {

private static final Map<Long, Item> store = new HashMap<>(); //실무에선 Hashmap사용보단 퀀커런트 해쉬맵 사용하자
	private static Long sequence = 0L; //static


	public Item save(Item item) {

		item.setId(++sequence);
		store.put(item.getId(), item);
		return item;

	}

	public Item findById(Long id) {
		return store.get(id);
	}

	public List<Item> findAll() {
	return new ArrayList<>(store.values()); //.value로 맵객체를 꺼내서 리스트에 저장 가능
	}

	public void update(Long itemId, Item updateParam) {

		Item findItem = findById(itemId);
		findItem.setItemName(updateParam.getItemName());
		findItem.setPrice(updateParam.getPrice());
		findItem.setQuantity(updateParam.getQuantity());

	}

	public void clearStore() {
		store.clear(); //테스트용 메서드 스토어 데이터 다 날리는용
	}
}
기능 : 저장,검색(하나보기),검색(전체보기),업데이트
상품 서비스 Css는 부트스트랩 사용 Resources/static/css/bootstrap.min.css
상품서비스 html(경로:static/html(생성))
AddForm – 상품등록 화면
<html>
<head>
<meta charset="utf-8">
<link href="../css/bootstrap.min.css" rel="stylesheet">
<style>
.container {
	max-width: 560px;
}
</style>
</head>
<body>
	<div class="container">
		<div class="py-5 text-center">
			<h2>상품 등록 폼</h2>
		</div>
		<h4 class="mb-3">상품 입력</h4>
		<form action="item.html" method="post">
			<div>
				<label for="itemName">상품명</label> <input type="text" id="itemName"
					name="itemName" class="form-control" placeholder="이름을 입력하세요">
			</div>
			<div>
				<label for="price">가격</label> <input type="text" id="price"
					name="price" class="form-control" placeholder="가격을 입력하세요">
			</div>
			<div>
				<label for="quantity">수량</label> <input type="text" id="quantity"
					name="quantity" class="form-control" placeholder="수량을 입력하세요">
			</div>
			<hr class="my-4">
			<div class="row">
				<div class="col">
					<button class="w-100 btn btn-primary btn-lg" type="submit">상품등록</button>
				</div>
				<div class="col">
					<button class="w-100 btn btn-secondary btn-lg"
						onclick="location.href='items.html'" type="button">취소</button>
				</div>
			</div>
		</form>
	</div>
	<!-- /container -->
</body>
</html>
editForm – 상품수정 화면
<html>
<head>
 <meta charset="utf-8">
 <link href="../css/bootstrap.min.css" rel="stylesheet">
 <style>
 .container {
 max-width: 560px;
 }
 </style>
</head>
<body>
<div class="container">
 <div class="py-5 text-center">
 <h2>상품 등록 폼</h2>
 </div>
 <h4 class="mb-3">상품 입력</h4>
 <form action="item.html" method="post">
 <div> <label for="itemName">상품명</label>
 <input type="text" id="itemName" name="itemName" class="form_control" placeholder="이름을 입력하세요">
 </div>
 <div>
 <label for="price">가격</label>
 <input type="text" id="price" name="price" class="form-control"
placeholder="가격을 입력하세요">
 </div>
 <div>
 <label for="quantity">수량</label>
 <input type="text" id="quantity" name="quantity" class="form_control" placeholder="수량을 입력하세요">
 </div>
 <hr class="my-4">
 <div class="row">
 <div class="col">
 <button class="w-100 btn btn-primary btn-lg" type="submit">상품
등록</button>
 </div>
 <div class="col">
 <button class="w-100 btn btn-secondary btn-lg"
onclick="location.href='items.html'" type="button">취소</button>
 </div>
 </div>
 </form>
</div> <!-- /container -->
</body>
</html>
아이템 전체보기 화면
<html>
<head>
<meta charset="utf-8">
<link href="../css/bootstrap.min.css" rel="stylesheet">
</head>
<body>
	<div class="container" style="max-width: 600px">
		<div class="py-5 text-center">
			<h2>상품 목록</h2>
		</div>
		<div class="row">
			<div class="col">
				<button class="btn btn-primary float-end"
					onclick="location.href='addForm.html'" type="button">상품 등록</button>
			</div>
		</div>
		<hr class="my-4">
		<div>
			<table class="table">
				<thead>
					<tr>
						<th>ID</th>
						<th>상품명</th>
						<th>가격</th>
						<th>수량</th>
					</tr>
				</thead>
				<tbody>
					<tr>
						<td><a href="item.html">1</a></td>
						<td><a href="item.html">테스트 상품1</a></td>
						<td>10000</td>
						<td>10</td>
					</tr>
					<tr>
						<td><a href="item.html">2</a></td>
						<td><a href="item.html">테스트 상품2</a></td>
						<td>20000</td>
						<td>20</td>
					</tr>
				</tbody>
			</table>
		</div>
	</div>
	<!-- /container -->
</body>
</html>
아이템 개별보기 화면
<html>
<head>
<meta charset="utf-8">
<link href="../css/bootstrap.min.css" rel="stylesheet">
<style>
.container {
	max-width: 560px;
}
</style>
</head>
<body>
	<div class="container">
		<div class="py-5 text-center">
			<h2>상품 상세</h2>
		</div>
		<div>
			<label for="itemId">상품 ID</label> <input type="text" id="itemId"
				name="itemId" class="form-control" value="1" readonly>
		</div>
		<div>
			<label for="itemName">상품명</label> <input type="text" id="itemName"
				name="itemName" class="form-control" value="상품A" readonly>
		</div>
		<div>
			<label for="price">가격</label> <input type="text" id="price"
				name="price" class="form-control" value="10000" readonly>
		</div>
		<div>
			<label for="quantity">수량</label> <input type="text" id="quantity"
				name="quantity" class="form-control" value="10" readonly>
		</div>
		<hr class="my-4">
		<div class="row">
			<div class="col">
				<button class="w-100 btn btn-primary btn-lg"
					onclick="location.href='editForm.html'" type="button">상품
					수정</button>
			</div>
			<div class="col">
				<button class="w-100 btn btn-secondary btn-lg"
					onclick="location.href='items.html'" type="button">목록으로</button>
			</div>
		</div>
	</div>
	<!-- /container -->
</body>
</html>
원래 HTML을 STATIC(정적) 폴더에 두면 안된다. Static에 둔다는 의미는 공개된다는 의미인데, 정식 서비스에서 이런다면 사용자 누구나가 접근할수 있다는 의미기 떄문이다. 공개할 필요가 없는 html을 static폴더에 두는것에 주의하자.
컨트롤러와 뷰 템플릿을 타임리프로 바꿔 보자.
@Controller
@RequestMapping("/basic/items")
@RequiredArgsConstructor
public class BasicItemController {

	private final ItemRepository itemRepository;

	@GetMapping
	public String items(Model model) {
	 List<Item> items = itemRepository.findAll();
	 model.addAttribute("items", items);
	 return  "basic/items";

	}

	//테스트용 데이터 추가
	@PostConstruct
	public void init() {
		itemRepository.save(new Item("itemA" , 10000, 10));
		itemRepository.save(new Item("itemB" , 20000, 30));
	}


}
@RequriedArgConstructor
final 이 붙은 맴버 변수만 사용해서 생성자를 자동으로 만들어준다. 컨트롤러를 빈으로 등록 시켜줘야 하는데 스프링은 생성자가 딱 1개만 있으면 해당 생성자에 @Autowired 의존관계를 주입해준다. 따라서 final 키워드를 뺴면 안된다. ItemRepository 그러면 의존관계 주입이 안된다.
정적 HTML을 뷰 템플릿으로 옮기자 /resources/static/items.html → 복사 → /resources/templates/basic/items.html 여기로 이동
- 정적템플릿을 동적 템플릿으로 구현해보자
<html xmlns:th = "http://www.thymeleaf.org">
<head>
<meta charset="utf-8">
<link th:href ="@{/css/bootstrap.min.css}"
      href="../css/bootstrap.min.css" rel="stylesheet">
</head>
<body>

	<div class="container" style="max-width: 600px">
		<div class="py-5 text-center">
			<h2>상품 목록</h2>
		</div>
		<div class="row">
			<div class="col">
				<button class="btn btn-primary float-end"
					onclick="location.href='addForm.html'"
					th:onclick="|location.href='@{/basic/items/add}'|"
					type="button">상품 등록</button>
			</div>
		</div>
		<hr class="my-4">
		<div>
			<table class="table">
				<thead>
					<tr>
						<th>ID</th>
						<th>상품명</th>
						<th>가격</th>
						<th>수량</th>
					</tr>
				</thead>
				<tbody>
					<tr th:each="item : ${items}">
					<td><a href="item.html" th:href="@{/basic/items/{itemId}(itemId=${item.id})}" th:text="${item.id}">회원id</a></td>
						<td><a href="item.html" th:href="@{/basic/items/{itemId}(itemId=${item.id})}" th:text="${item.itemName}">상품명</a></td>
						<td th:text ="${item.price}">10000</td>
						<td th:text="${item.quantity}">10</td>
					</tr>


				</tbody>
			</table>
		</div>
	</div>
	<!-- /container -->
</body>
</html>
<html xmlns:th = "http://www.thymeleaf.org">
맨 첫줄에 타임리프 선언을 한다.추가해야 타임리프 문법을 사용 할 수 있다.
<link th:href ="@{/css/bootstrap.min.css}">
URL링크를 사용하는 경우 th:href = “@{ 링크 }” 와 같은식으로 타임리프 문법을 사용한다. 위의 코드는 타임리프를 사용해 css의 절대경로를 지정한다.
<th:onclick="|location.href='@{/basic/items/add}'|"></th>
위 코드는 리터럴 대체 문법이 사용됐다. 리터럴 대체 문법은 |…| , 형식으로 사용된다. 타임리프에서 문자와 표현식 등은 분리되어 있기 때문에 더해서 사용해야 한다.
리터럴 대체 문자 사용 안할시
<span th:text="'Welcome to our application, ' + ${user.name} + '!'">
리터럴 대체문자 사용시
<span th:text="|Welcome to our application, ${user.name}!|">
리터럴 대체 문법을 사용하면 + 를 기호를 사용하지 않는다.
<tr th:each="item : ${items}">
					<td><a href="item.html" th:href="@{/basic/items/{itemId}(itemId=${item.id})}" th:text="${item.id}">회원id</a></td>
						<td><a href="item.html" th:href="@{/basic/items/{itemId}(itemId=${item.id})}" th:text="${item.itemName}">상품명</a></td>
						<td th:text ="${item.price}">10000</td>
						<td th:text="${item.quantity}">10</td>
</tr>
반복은 th:each 를 사용한다. 이렇게 하면 모델에 포함된 items 컬렉션 데이터가 item 변수에 하나씩 포함되고, 반복문 안에서 item 변수를 사용할 수 있다. 컬렉션의 수 만큼 .. 이 하위 태그를 포함해서 생성된다.
<td th:text ="${item.price}">10000</td>
변수 표현식은 ${} 형식의 프로퍼티 접근 법으로 변수에 접근 할 수 있다.
내용 변경
- th:text 10000 내용의 값을 th:text 의 값으로 변경한다
- 여기서는 10000을 ${item.price} 의 값으로 변경한다.
URL 링크 표현식2
- @{…}, th:href=”@{/basic/items/{itemId}(itemId=${item.id})}” 상품 ID를 선택하는 링크를 확인해보자.
URL 링크 표현식을 사용하면 경로를 템플릿처럼 편리하게 사용할 수 있다. 여기선 ${item.id}가 결국 {item.id}로 들어가 치환된다. 경로 변수( {itemId} ) 뿐만 아니라 쿼리 파라미터도 생성한다. 지저분하고 어려워 보이지만 직접 문자 + 등등 하다보면 훨씬 편하다는걸 느낄수있다.
ex)
th:href="@{/basic/items/{itemId}(itemId=${item.id}, query='test')}"
생성 링크: http://localhost:8080/basic/items/1?query=test
타임리프는 순수HTML파일을 웹브라우저에서 열어도 확인 가능, 서버를 통해 뷰템플릿을 거치면 동적으로도 변경이 가능, JSP파일은 소스코드와 HTML이 뒤죽박죽되어서 정상적인 확인이 불가능함..
상품 상세보기 컨트롤러와 타임리프 템플릿 만들기
-컨트롤러
매핑(/{아이디값}) 이 들어오면 아래의 메서드가 실행된다. @pathVariable 로 url주소가 아이디값으로 배정되며, 모델객체에 item값을 담는다. 후에 basic/item html로 이동한다.
<html xmlns:th = "http://www.thymeleaf.org">
<head>
<meta charset="utf-8">
<link th:href = "@{/css/bootstrap.min.css}"
			href="../css/bootstrap.min.css" rel="stylesheet">
<style>
.container {
	max-width: 560px;
}
</style>
</head>
<body>
	<div class="container">
		<div class="py-5 text-center">
			<h2>상품 상세</h2>
		</div>
		<div>
			<label for="itemId">상품 ID</label>
			 <input type="text" id="itemId"	name="itemId" class="form-control"
			  value="1" th:value="${item.id}" readonly>
		</div>
		<div>
			<label for="itemName">상품명</label> <input type="text" id="itemName"name="itemName" class="form-control"
			 value="상품A" th:value="${item.itemName}" readonly>
		</div>
		<div>
			<label for="price">가격</label>
			<input type="text" id="price"name="price" class="form-control"
			 value="10000" th:value="${item.price}" readonly>
		</div>
		<div>
			<label for="quantity">수량</label> <input type="text" id="quantity"name="quantity" class="form-control"
			 value="10" th:value="${item.quantity}" readonly>
		</div>
		<hr class="my-4">
		<div class="row">
			<div class="col">
				<button class="w-100 btn btn-primary btn-lg"
					onclick="location.href='editForm.html'"
					th:onclick="|location.href='@{basic/items/{itemId}/edit(itemId=${item.id})}'|"
					type="button">상품수정</button>
			</div>
			<div class="col">
				<button class="w-100 btn btn-secondary btn-lg"
					onclick="location.href='items.html'"
					th:onclick="|location.href='@{/basic/items}'|"
					type="button">목록으로</button>
			</div>
		</div>
	</div>
	<!-- /container -->
</body>
</html>
별 다른 것 없이 프로퍼티 접근법을 추가해주고
th:value="${item.id}"
th:value="${item.itemName}"
th:value="${item.price}
th:value="${item.quantity}"
th:onclick="|location.href='@{basic/items/{itemId}/edit(itemId=${item.id})}'|"
th:onclick="|location.href='@{/basic/items}'|"
상품수정 링크와 목록링크를 타임리프 문법으로 동적으로 바꿔주었다.
상품 등록 폼 컨트롤러에 다음과 같이 추가해주었다.
	@GetMapping("/add")
	public String addForm() {
		return "basic/addForm";
	}

	@PostMapping("/add")
	public String save() {
		return "basic/addForm";
	}
겟,포스트 매핑에 파라미터 값을 /add라 주어서 읽을때는 get, 데이터를 저장할때는 post방식으로 처리 하게 두었음.
상품 등록 타임리프 템플릿으로 변경
<html xmlns:th = "http://www.thymeleaf.org">
<head>
<meta charset="utf-8">
<link th:href = "@{/css/bootstrap.min.css}"
href="../css/bootstrap.min.css" rel="stylesheet">
<style>
.container {
	max-width: 560px;
}
</style>
</head>
<body>
	<div class="container">
		<div class="py-5 text-center">
			<h2>상품 등록 폼</h2>
		</div>
		<h4 class="mb-3">상품 입력</h4>
		<!-- 등록을 누르면  /basic/items/add 로 가야한다 폼을 열때는 get, 실제저장은 post를 사용 같은 url이 와도 기능이 다르게 동작-->
		<form action="item.html" th:action method="post">
			<div>
				<label for="itemName">상품명</label> <input type="text" id="itemName"
					name="itemName" class="form-control" placeholder="이름을 입력하세요">
			</div>
			<div>
				<label for="price">가격</label> <input type="text" id="price"
					name="price" class="form-control" placeholder="가격을 입력하세요">
			</div>
			<div>
				<label for="quantity">수량</label> <input type="text" id="quantity"
					name="quantity" class="form-control" placeholder="수량을 입력하세요">
			</div>
			<hr class="my-4">
			<div class="row">
				<div class="col">
					<button class="w-100 btn btn-primary btn-lg" type="submit">상품등록</button>
				</div>
				<div class="col">
					<button class="w-100 btn btn-secondary btn-lg"
						onclick="location.href='items.html'"
						th:onclick="|location.href='@{/basic/items}'|"
						type="button">취소</button>
				</div>
			</div>
		</form>
	</div>
	<!-- /container -->
</body>
</html>
속성 변경 - th:action
th:action - action뒤에 url값을 주지 않았다.
HTML form에서 action 에 값이 없으면 현재 URL에 데이터를 전송한다.(form/add) 상품 등록 폼의 URL과 실제 상품 등록을 처리하는 URL을 똑같이 맞추고 HTTP 메서드로 두 기능을 구분한다.
상품 등록 처리 - @ModelAttribute
//	@PostMapping("/add")
	public String save(@RequestParam String itemName,
					   @RequestParam Integer price,
					   @RequestParam Integer quantity,
					   Model model) {

		Item item = new Item();
		item.setItemName(itemName);
		item.setPrice(price);
		item.setQuantity(quantity);

		itemRepository.save(item);

		model.addAttribute("item", item); //저장된 결과물로 바로 보여줌

		return "basic/item";
	}

//	@PostMapping("/add")
	public String addItemV2(@ModelAttribute("item") Item item, Model model) {
//위에 리퀘스트 파람과 비교하면 신세계다. 객체를 만들어주고 셋을 불러 모델의 값을 자동으로 값을 저장해준다
//@ModelAttribute("item") ->모델 에트리뷰트(파라미터에 네임값을 주면)  모델에 addAttribute("네임값",네임값) 을 자동으로 해줌
		itemRepository.save(item);
//		model.addAttribute("item", item); //저장된 결과물로 바로 보여줌

		return "basic/item";
	}


	@PostMapping("/add")
	public String addItemV3(@ModelAttribute Item item, Model model) {
		//모델 Attribute에 아이템 값을 뺴면? 클래스의 이름 Item -> item의 소문자 형태로 변경, 그다음 모델 에트리뷰트에 추가
		itemRepository.save(item);

		return "basic/item";

 }
@RequestParam과 @ModelAttribute 비교를 위해 둘다 사용해 보았다. RequestParam같은 경우 model객체를 직접 만들어서 직접 set으로 데이터를 넣어주었지만 ModelAttribute는 객체를 자동으로 만들고 set으로 데이터를 자동으로 넣어준다. 또한 ModelAttribute(네임값) 을 넣어주면 네임값에 변수이름을 인식해 model.addAttribute 과정도 자동으로 해주는 것을 볼수 있음.
상품수정 컨트롤러
//컨트롤러에 아래 코드 추가
@GetMapping("/{itemId}/edit")
	public String editForm(@PathVariable Long ItemId, Model model) {
		Item item = itemRepository.findById(itemId);
		model.addAttribute("item", item);
		return "basic/editForm";
	}
- @PathVariable 사용 (아이템 id값으로 상품 상세보기로 넘어가기 위해 , id값으로 url path를 사용)
상품수정 타임리프 템플릿으로 수정
<html xmlns:th="http://www.thymeleaf.org">
<head>
<meta charset="utf-8">
<link href="../css/bootstrap.min.css"
	th:href="@{/css/bootstrap.min.css}" rel="stylesheet">
<style>
.container {
	max-width: 560px;
}
</style>
</head>
<body>
	<div class="container">
		<div class="py-5 text-center">
			<h2>상품 수정 폼</h2>
		</div>
		<form action="item.html" th:action method="post">
			<div>
				<label for="id">상품 ID</label> <input type="text" id="id" name="id"
					class="form-control" value="1" th:value="${item.id}" readonly>
			</div>
			<div>
				<label for="itemName">상품명</label> <input type="text" id="itemName"
					name="itemName" class="form_control" value="상품A"
					th:value="${item.itemName}">
			</div>
			<div>
				<label for="price">가격</label> <input type="text" id="price"
					name="price" class="form-control" th:value="${item.price}">
			</div>
			<div>
				<label for="quantity">수량</label> <input type="text" id="quantity"
					name="quantity" class="form_control" th:value="${item.quantity}">
			</div>
			<hr class="my-4">
			<div class="row">
				<div class="col">
					<button class="w-100 btn btn-primary btn-lg" type="submit">저장</button>
				</div>
				<div class="col">
					<button class="w-100 btn btn-secondary btn-lg"
						onclick="location.href='item.html'"
						th:onclick="|location.href='@{/basic/items/{itemId}(itemId=${item.id})}'|"
						type="button">취소</button>
				</div>
			</div>
		</form>
	</div>
	<!-- /container -->
</body>
</html>
상품 수정은 상품 등록과 전체 프로세스가 유사하다.
// GET /items/{itemId}/edit : 상품 수정 폼
// POST /items/{itemId}/edit : 상품 수정 처리

@PostMapping("/{itemId}/edit")
	public String edit(@PathVariable Long itemId, @ModelAttribute Item item) {
		itemRepository.update(itemId, item);
		//저장후 상품상세로 이동 (리다이렉트), HTTP 상태코드 302, 결과가 리다이렉트면 URL자체를 지정(리턴) 경로로 이동, 컨트롤러로 부터 서버내에서 재 호출
		return "redirect:/basic/items/{itemId}";
	}
//@PostMapping 추가 (상품 저장) 후 리다이렉트로 상품개별보기 화면을 재호출
리다이렉트 상품 수정은 마지막에 뷰 템플릿을 호출하는 대신에 상품 상세 화면으로 이동하도록 리다이렉트를 호출한다.
스프링은 redirect:/… 으로 편리하게 리다이렉트를 지원한다. redirect:/basic/items/{itemId}” 컨트롤러에 매핑된 @PathVariable의 값은 redirect 에도 사용 할 수 있다. 즉 매핑값을 편하게 리다이렉트로 다시 호출 하는 것!
.redirect:/basic/items/{itemId} {itemId} 는 @PathVariable Long itemId 의 값을 그대로 사용한다.
그러나
지금까지 만든 프로그램은 심각한 오류가 있음 상품 등록후 새로고침 F5를 누르면

위와 같은 경고창이 나타난다. 이를 무시하고 새로고침을 진행할시
첫 번째 새로고침 
두 번째 새로고침 
등록을 누르지 않고, 새로 고침만 하였는데 상품 ID가 자동적으로 증가 되는 것을 알 수 있다. 즉, 새로고침 자체가 등록 처리 되어서 넘어가는 것이다.
Why? 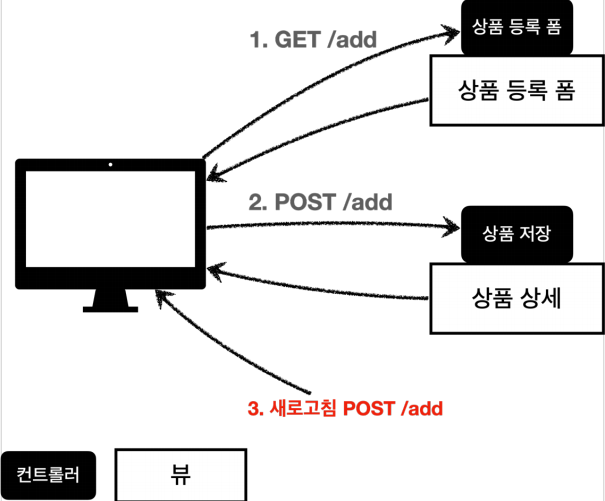
상품 등록을 위해 GET을 불러온뒤 등록 버튼을 누르면 내가 만든 POST가 호출되어 상품 저장이 실행된다. 상품 저장후 다시 컨트롤러로 돌아오면 마지막에 실행한 행위는 POST/ADD 이다.
새로고침이란? 웹브라우저에서 내가 했던 마지막에 했던 행위를 다시 요청 하는 것 그래서 F5를 할 때 마다 ADD가 요청되어 상품이 계속 등록되는 현상이 만들어졌던 것이다.
해결법 - PRG패턴
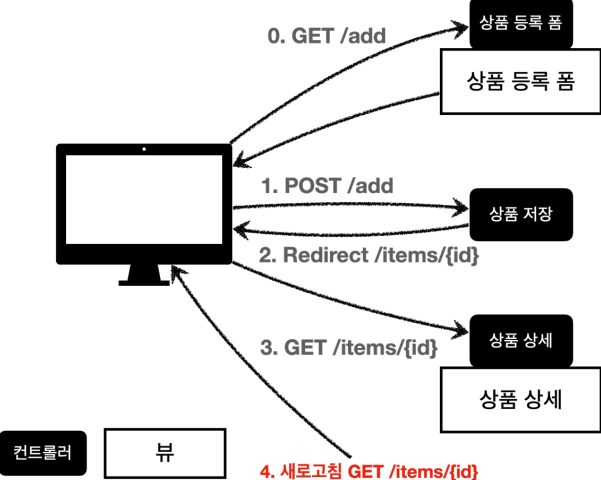
- 이전 요청을 없애기 위해 redirect를 호출로 웹브라우저 입장에서 완전히 새로운 요청(상품상세)로 보내버리면, 마지막 호출이 상품상세를 마지막 요청으로 인식하게 만든다.
이 처리 과정을 PRG(POST,Redirect,Get) 패턴이라고 한다.
변경 전
@PostMapping("/add")
	public String addItemV3(@ModelAttribute Item item, Model model) {
		itemRepository.save(item);

		return "basic/item";
	}
변경 후
@PostMapping("/add")
	public String addItemV4(@ModelAttribute Item item, Model model) {
		//모델 Attribute에 아이템 값을 뺴면? 클래스의 이름 Item -> item의 소문자 형태로 변경, 그다음 모델 에트리뷰트에 추가
		itemRepository.save(item);
		return "redirect:/basic/items/" + item.getId();
}
저장후 F5를 눌러도 마지막 요청인 GET이 실행돼, 상품상세 페이지를 보여줌, 따라서 새로고침을 해도 상품 상세화면으로 이동하게 되므로 새로고침 문제를 해결한다.
Redirect: 로 기존 경로 호출후 + id값 하면 id값에 해당하는 상품 상세보기로 새로 호출!
개발자 도구로 확인
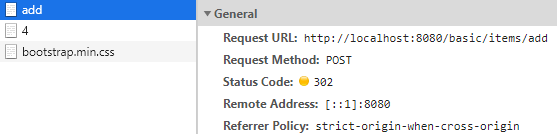
- add
- Status Code : 302(Redirect)
Location :http://localhost:8080/basic/items/4 로 다시 호출 하게됨
Redirect 호출 후
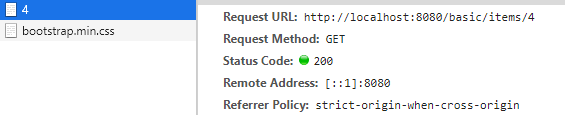
상품 상세보기 url이 겟 방식으로 호출된다. 그래서 결국 마지막 호출인 get이 최종적으로 새로고침시에 실행된다.
❗❗ 주의
return "redirect:/basic/items/" + item.getId();
redirect 리턴사용시 사용자가 직접 item.getId() 같은 방법으로 코드를 작성하면 위험함 지금 같은 경우 ID가 단순히 int 값이라 값에 문제가 없지만 , 한글이나 다른 문자코드가 들어 갈시에는 인코딩을 해서 넘겨야한다.
이러한 문제를 해결하기 위해 RedirectAttribute를 사용하자
@RedirectAttributes -상품 저장 후 “저장 되었습니다” 메시지 추가해보기.
 @PostMapping("/add")
 public String addItemV5(Item item, RedirectAttributes redirectAttributes) {
   //모델 Attribute에 아이템 값을 뺴면? 클래스의 이름 Item -> item의 소문자 형태로 변경, 그다음 모델 에트리뷰트에 추가
   Item savedItem = itemRepository.save(item);
   redirectAttributes.addAttribute("itemId", savedItem.getId());
   redirectAttributes.addAttribute("status", true); //status가 true면 저장됐다고 인식
   return "redirect:/basic/items/{itemId}";
   //리다이렉트 에트리뷰트 아이디가 {itemId}로 치환, 기본적인 url인코딩도 모두 해결
 }
실행시켜보면 http://localhost:8080/basic/items/3?status=true
3?status= true : userId값으로 잘 치환 됐다.
이제 저장후 돌아가는 화면인 상품상세보기에 ‘저장되었습니다’ 문구가 출력되게 해보자 item.html 으로 가서 아래 코드를 추가했다.
<h2 th:if="${param.status}" th:text="'저장 완료'"></h2>
상품등록을 해보면
‘저장완료’의 메시지가 성공적으로 출력된다. 타임리프 문법인 th:if는 “${가정문}” 이 참이면 문장을 실행한다 결국 param.status, 즉 앞에서 redirect.status상태가 true(저장이 잘됨) 으로 넘어 왔기 때문에 th:text =’저장완료’가 실행되어 잘 출력 된 것을 볼 수 있다.
최종 테스트화면
초기 목록 화면 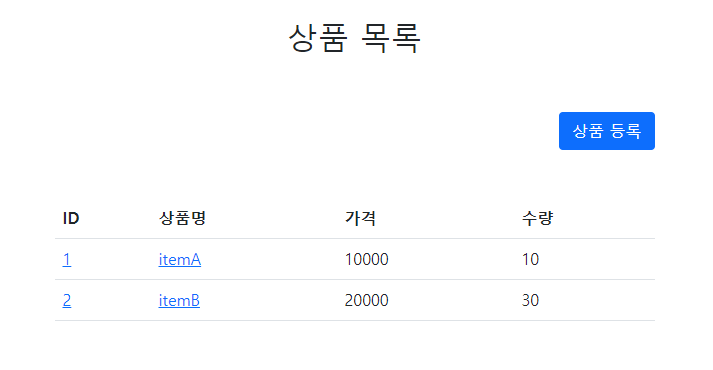
상품 등록화면 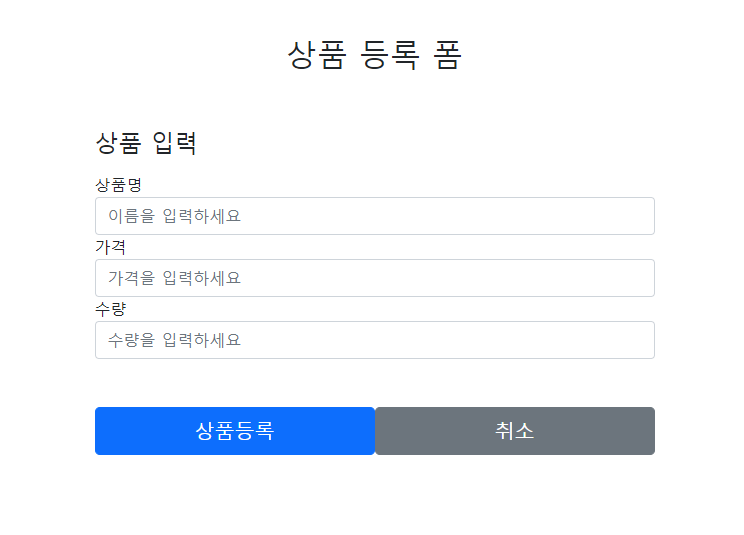
상품명 : 강나루 , 가격: 30000 , 수량: 1 입력
상품 상세화면 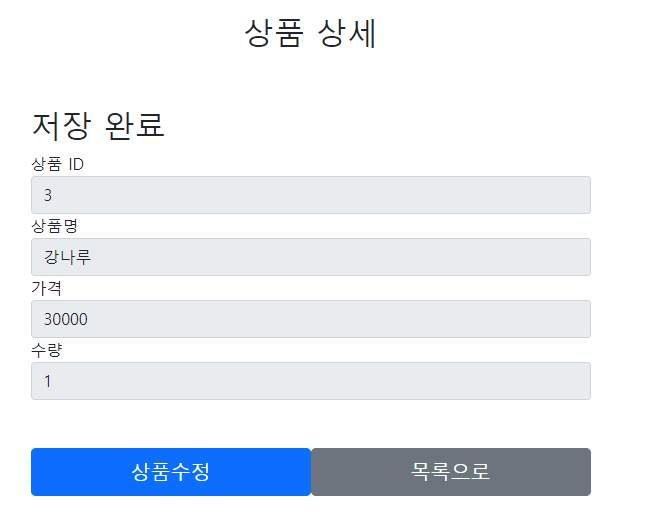
입력후 저장 화면으로 돌아감.
상품 등록 후 목록화면 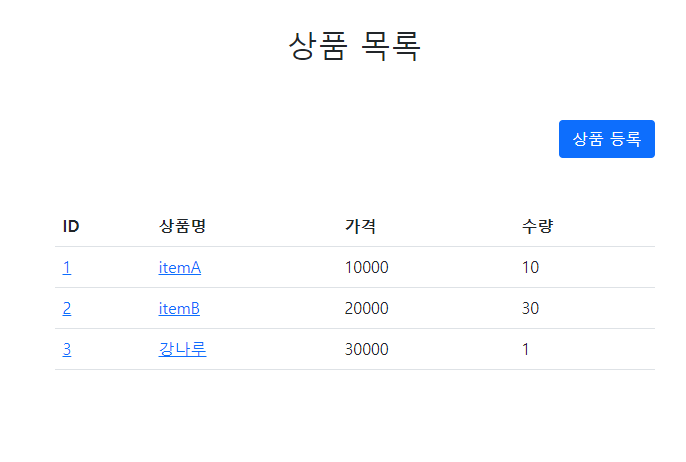
ID값 입력값 모두 정상적으로 출력
보충 할점
아직 URL을 능숙하게 다루기 어려웠고 타임리프 문법도 좀 더 공부 해야겠다.

이번생은 개발자로 살아보기!